How to Set Up Zapier for MCP Integration
What Is Zapier?
Zapier is an automation platform that connects applications and services without requiring custom integrations for each one. At a high level, Zapier allows you to trigger actions in one application based on events in another, automate repetitive workflows across different tools, and interact with SaaS products through standardized actions, enabling integrations without writing custom backend logic for each connection.
Zapier supports thousands of applications, including email, calendars, spreadsheets, project management tools, databases, and collaboration platforms. Instead of writing and maintaining individual API integrations, developers and teams can rely on Zapier’s pre-built connectors.
In the context of AI systems, Zapier acts as a universal action layer. Rather than teaching an agent how to speak to Gmail, Google Sheets, Notion, and Slack individually, you expose those capabilities through a single, consistent interface.
What Is MCP, in Practical Terms?
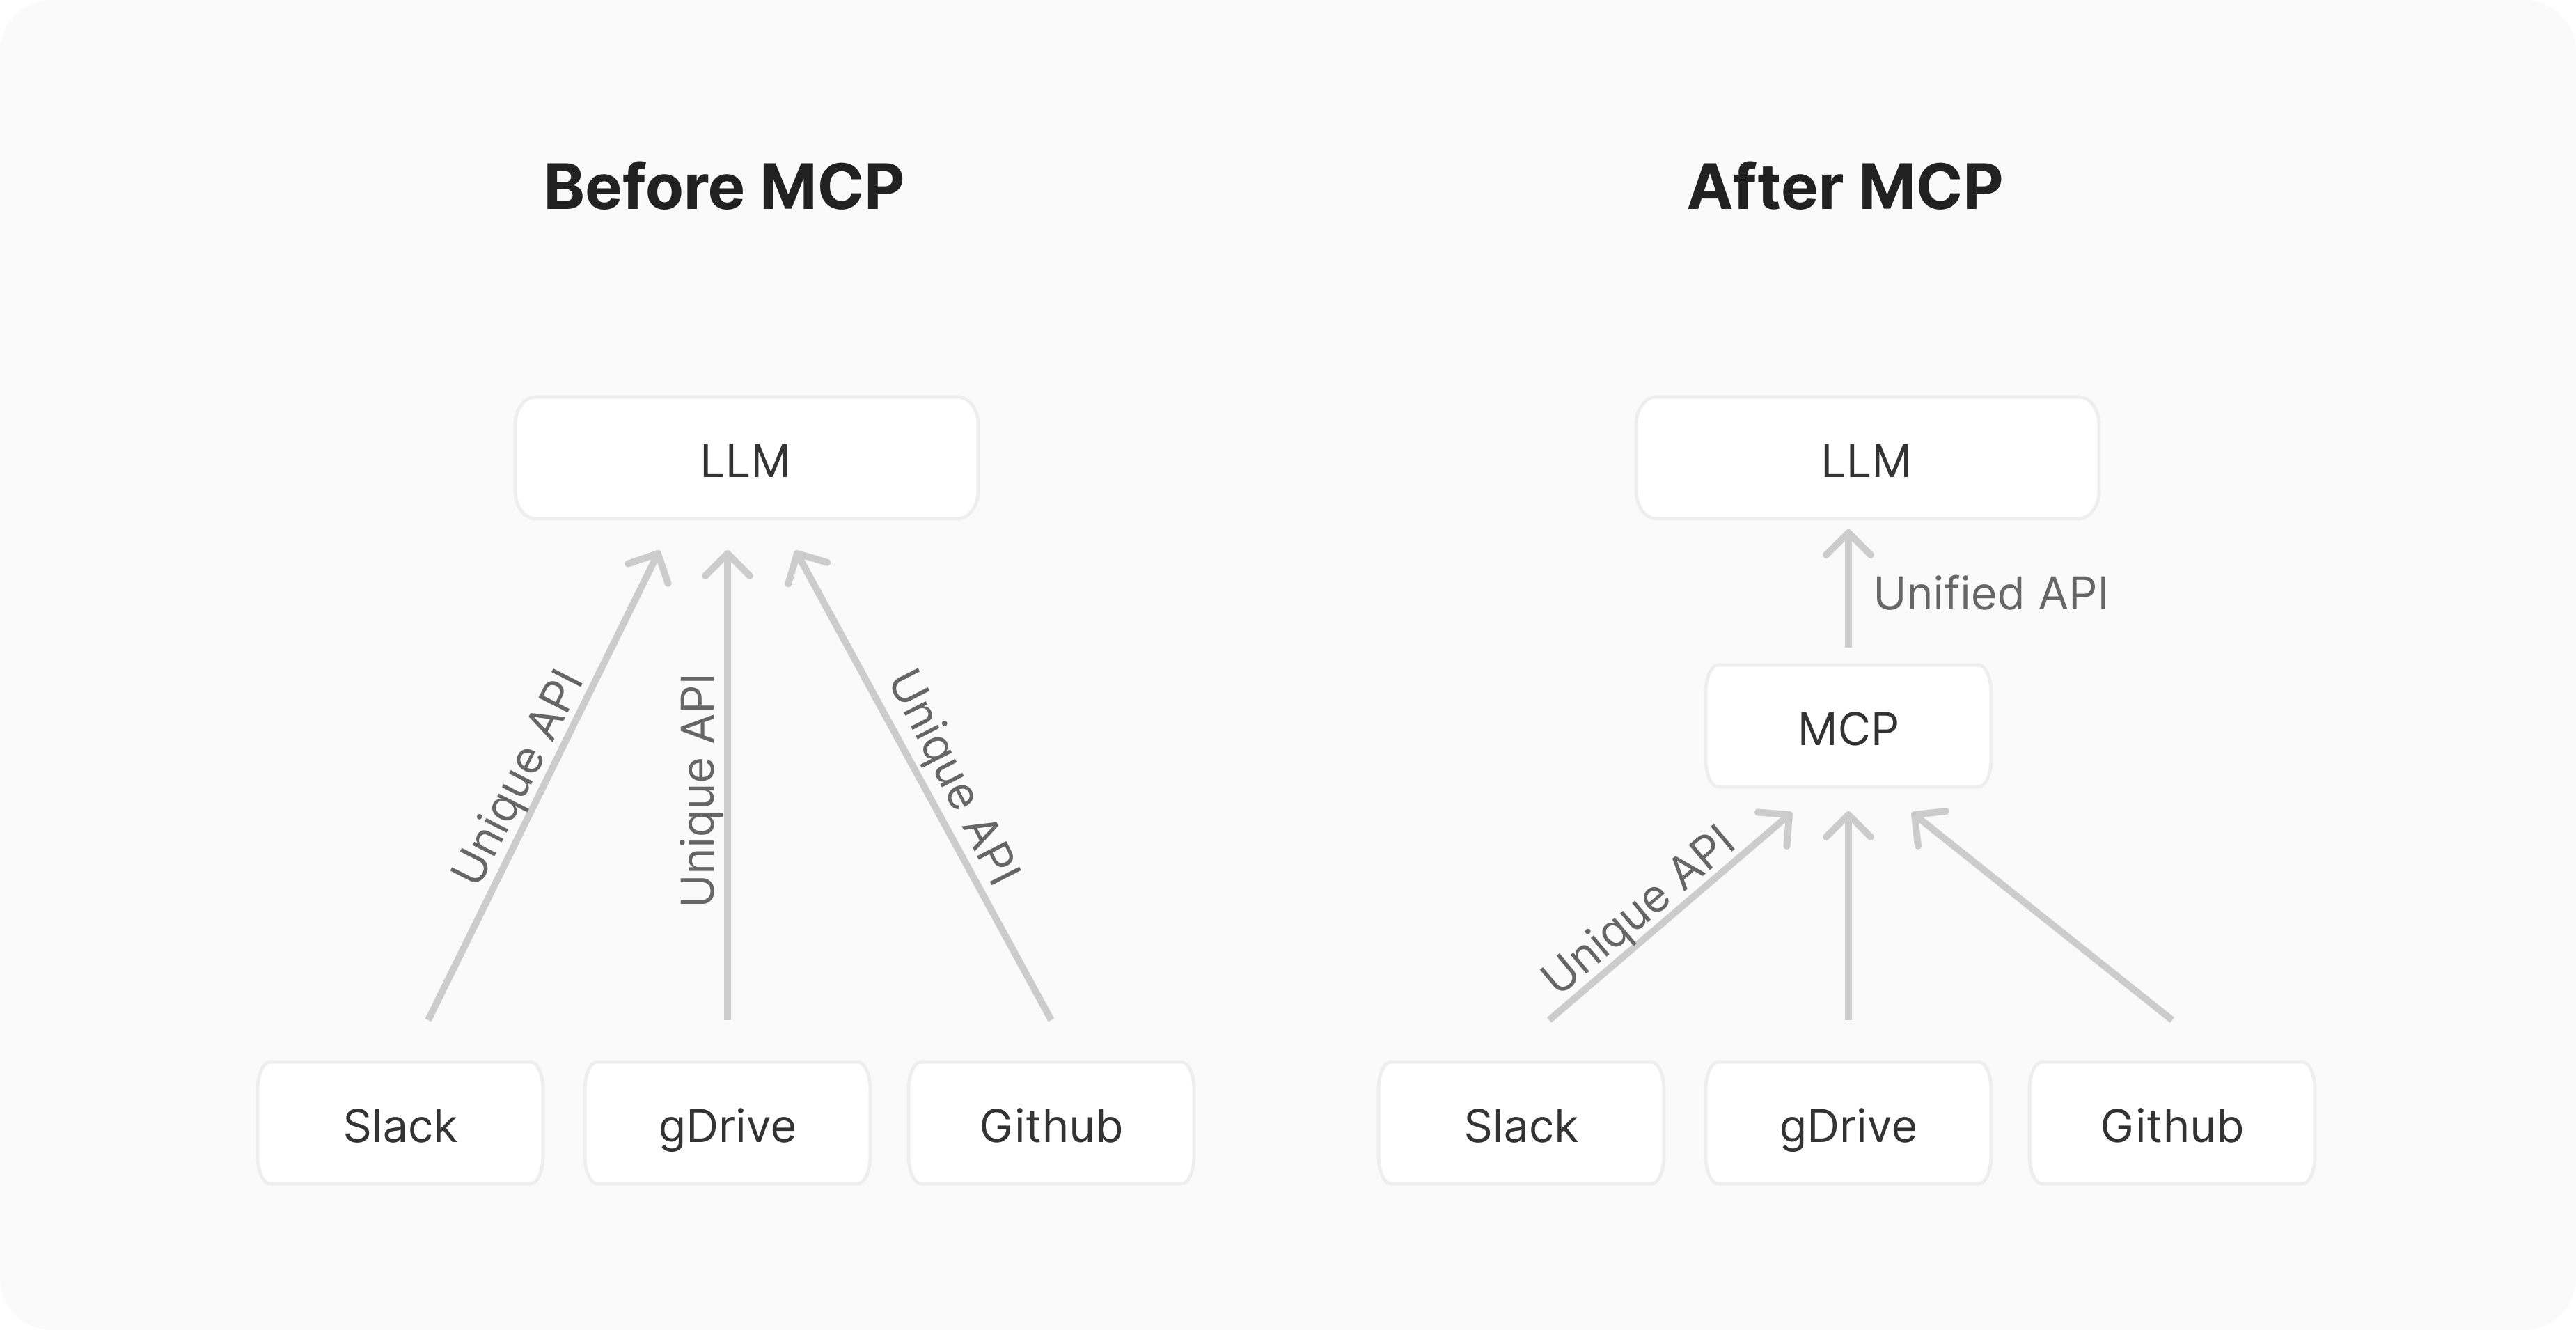
Model Context Protocol Before vs. After
MCP (Model Context Protocol) is a standard that allows AI systems to interact with external tools in a structured, discoverable, and controlled way. It separates responsibilities into two roles:
- MCP Server: Exposes tools and actions
- MCP Client: Connects to the server and invokes those tools
Instead of hardcoding tool logic directly into an application, MCP enables an AI system to dynamically discover and query its environment by asking what tools are available, what actions those tools can perform, and what inputs or parameters they require, making integrations more flexible and extensible. This makes tool usage more dynamic, modular, and easier to evolve over time.
MCP Clients and MCP Servers
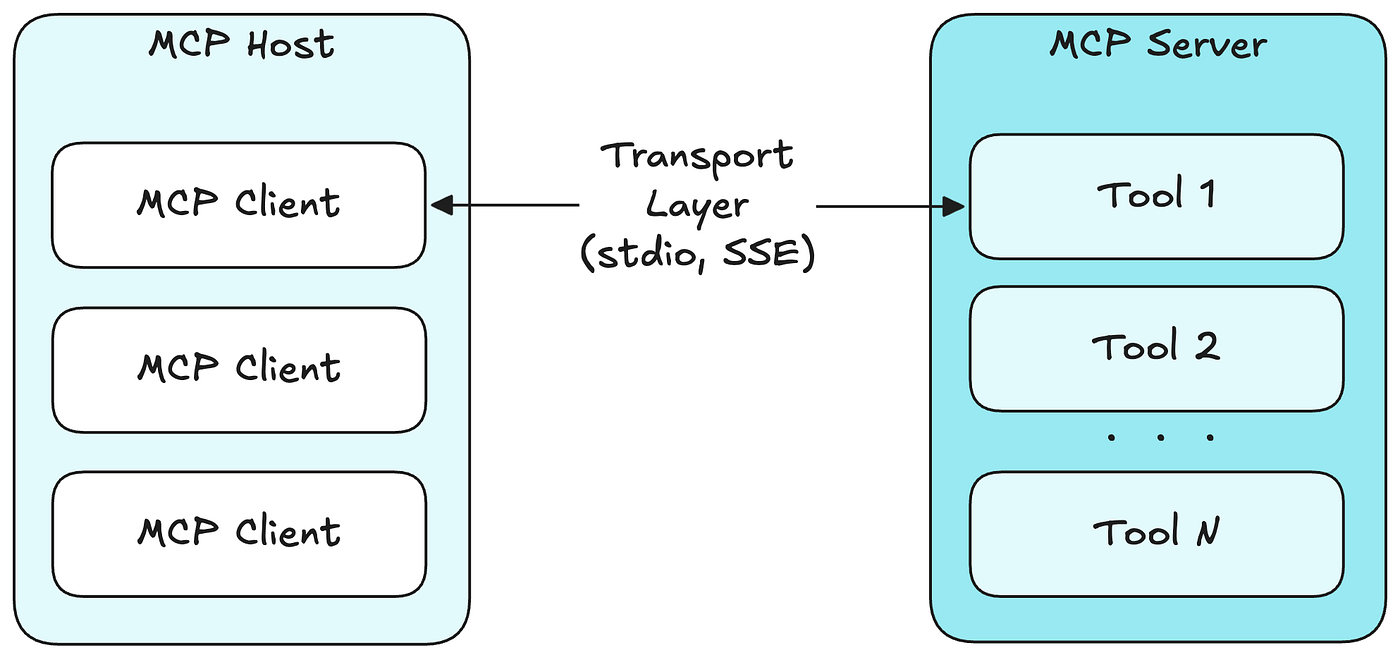
An MCP server is responsible for defining and exposing capabilities. In this setup, Zapier acts as the MCP server by exposing actions like “send email,” “create spreadsheet row,” or “create calendar event.”
An MCP client is the application that connects to an MCP server and invokes the tools it exposes. This client can take many forms, including Python applications, AI chatbots, developer tools, or IDE integrations—any system that needs to discover, call, and coordinate external capabilities through a standardized interface.
Zapier currently supports multiple MCP clients, such as:
- Claude (Claude Code)
- ChatGPT
- Cursor
- Custom Python-based agents
In this guide, we use a Python MCP client, but the Zapier-side setup is largely the same regardless of which client you use. The key idea is that the MCP server (Zapier) remains stable, while clients can change.
Setting Up Zapier for MCP Integration (Step-by-Step Tutorial)
With the conceptual foundation in place, we can move into the practical setup. In this section, you will create a Zapier MCP server, configure authentication, and add tools that can be used by an MCP-compatible client. The goal is to create a reusable, general-purpose MCP server that can support a wide range of automations through Zapier.
Prerequisites
Before you begin, make sure you have:
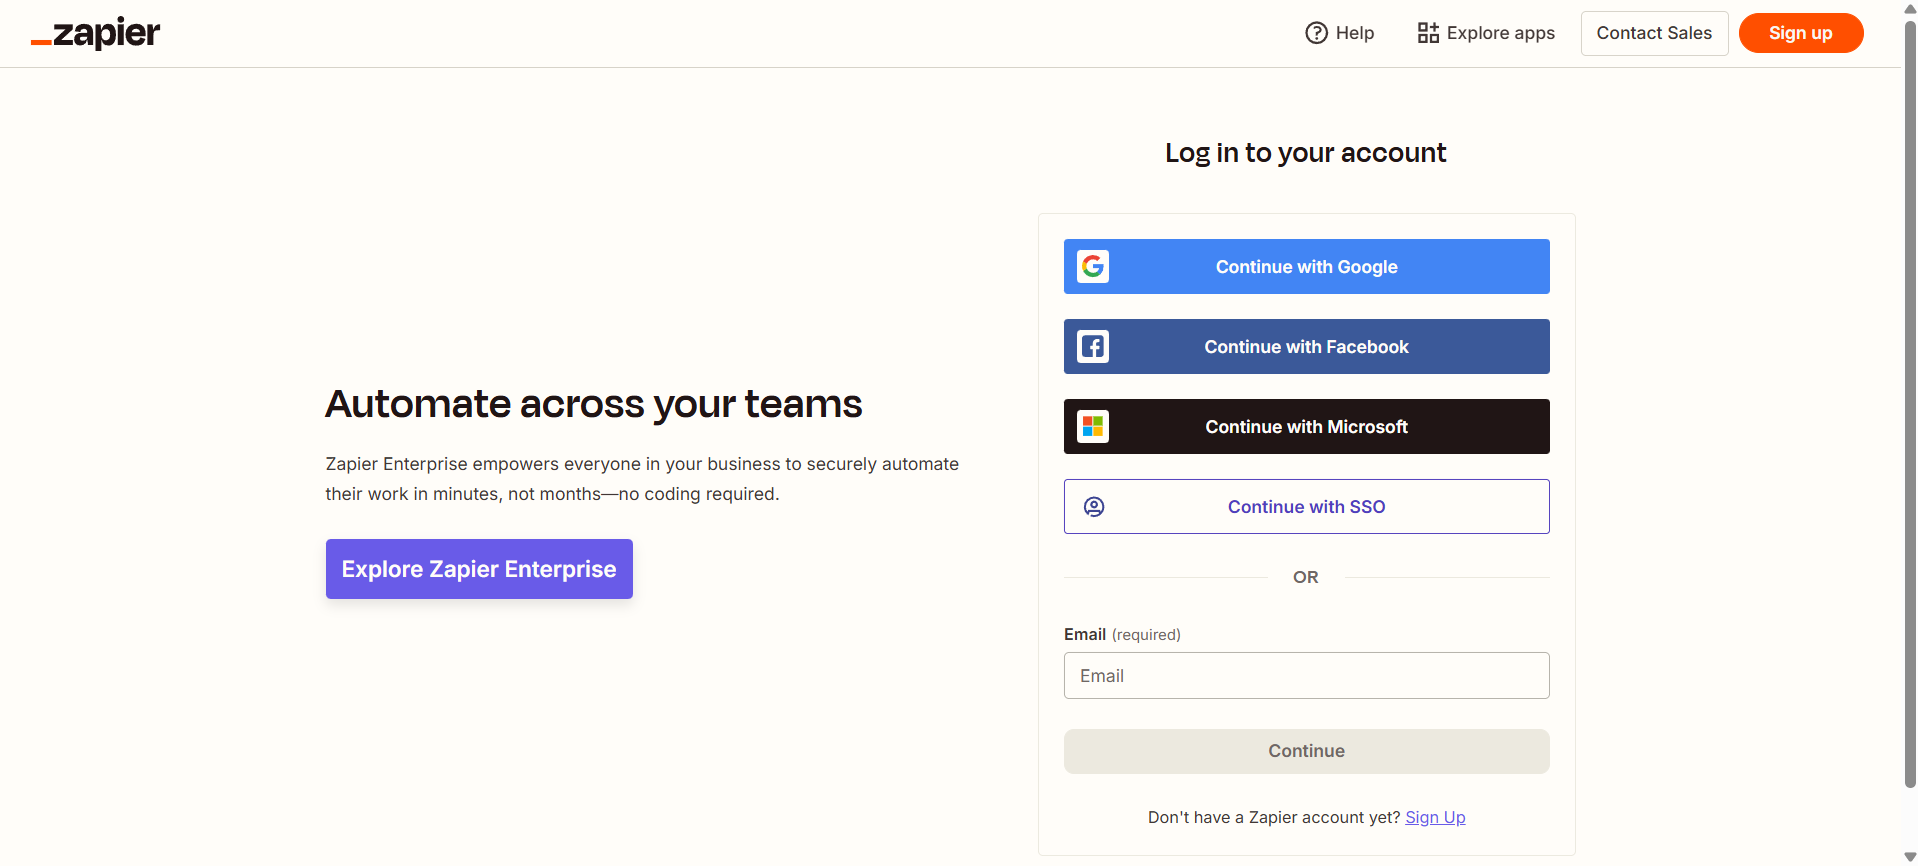
A Zapier account (a free plan is sufficient to get started). You can sign up on Zapier.
Step 1: Create an MCP Server in Zapier
1. Open the Zapier MCP Portal
Navigate to Zapier MCP.
Sign in using your Zapier account credentials. This portal is where all MCP-related configuration happens.
2. Create a New MCP Server
From the MCP dashboard:
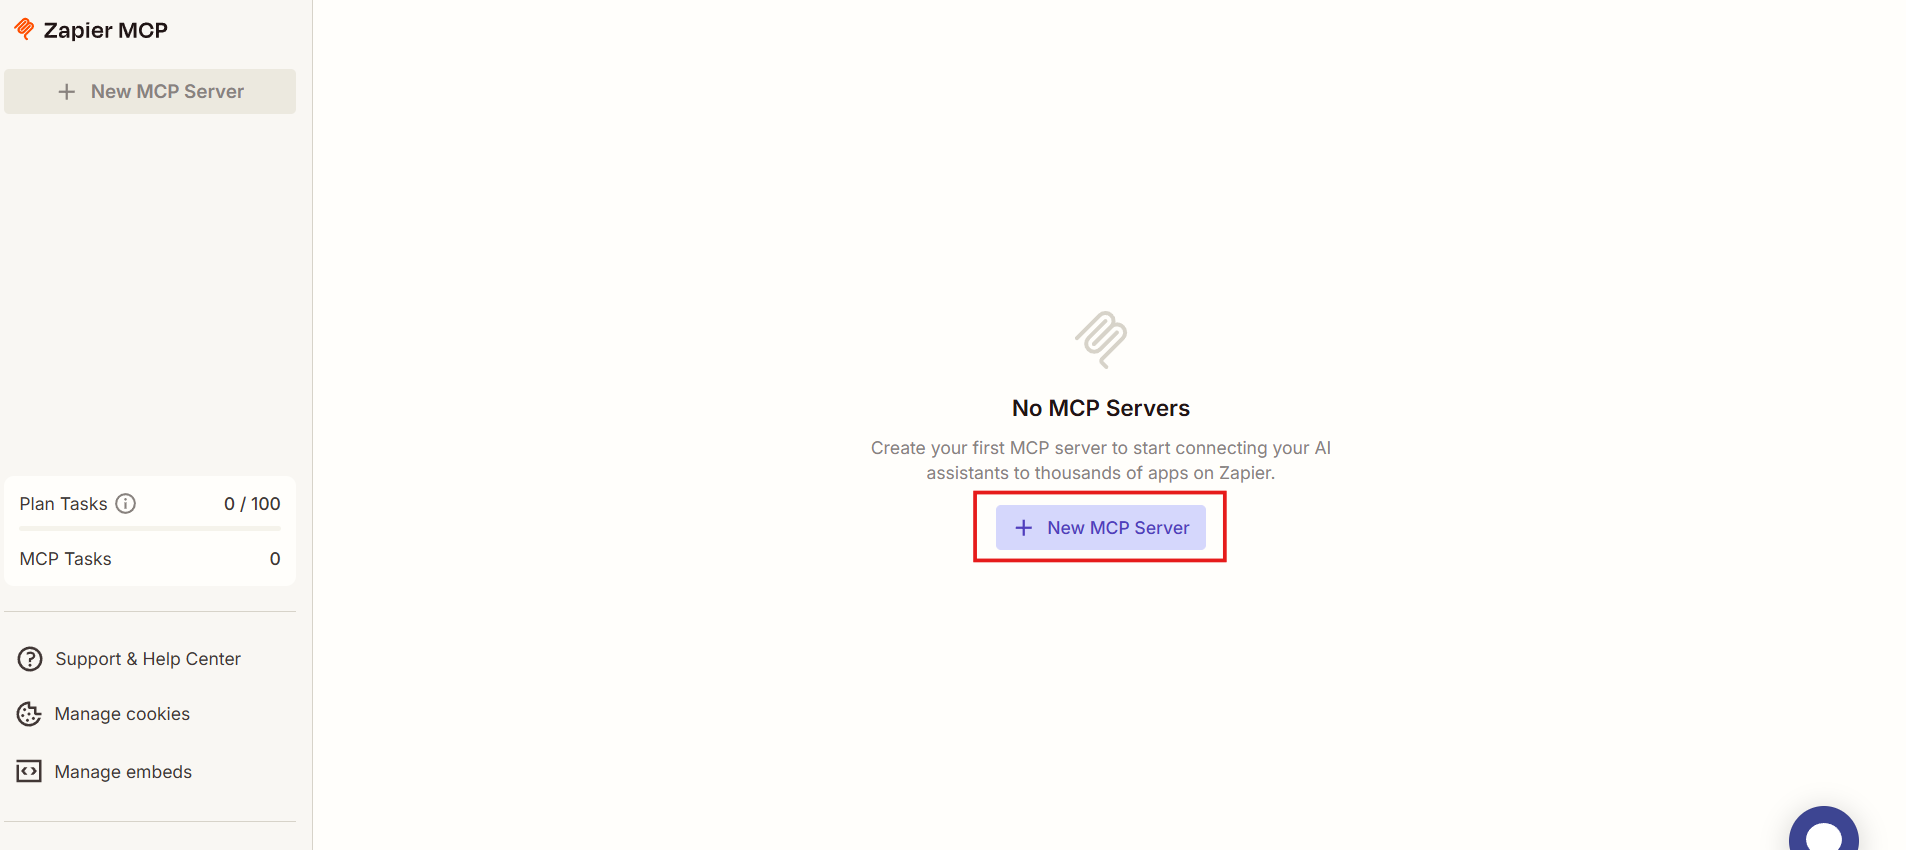
Click + New MCP Server to begin creating a new MCP server that will expose Zapier actions to external AI clients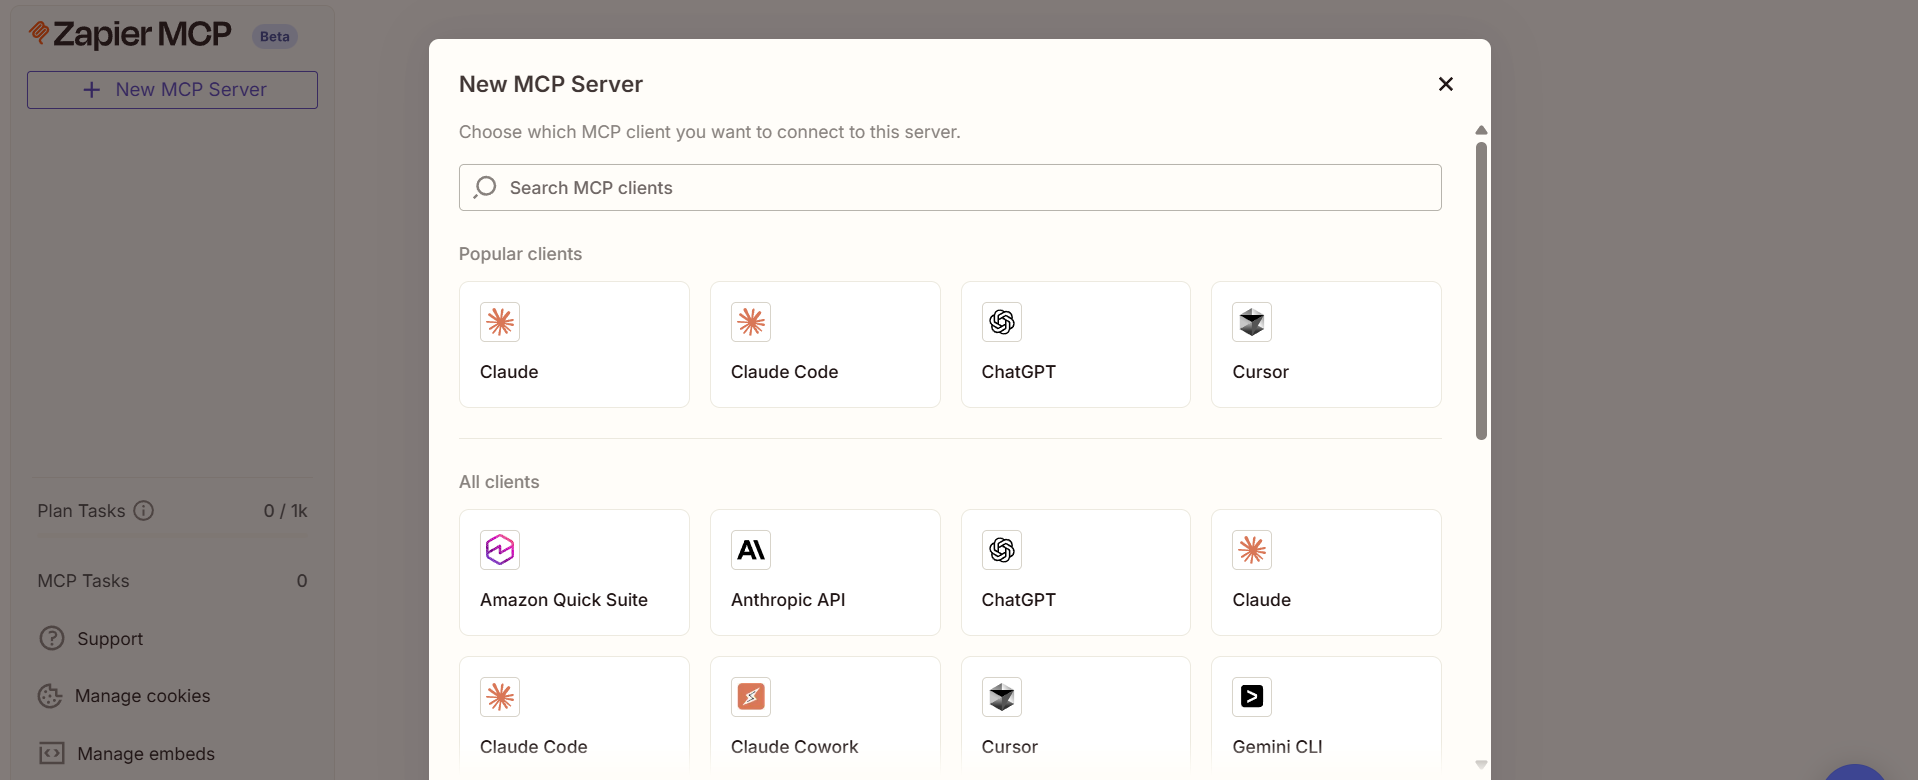
For MCP Client, select Python, which configures the server for Python-based agents and applications and determines the connection examples shown by Zapier
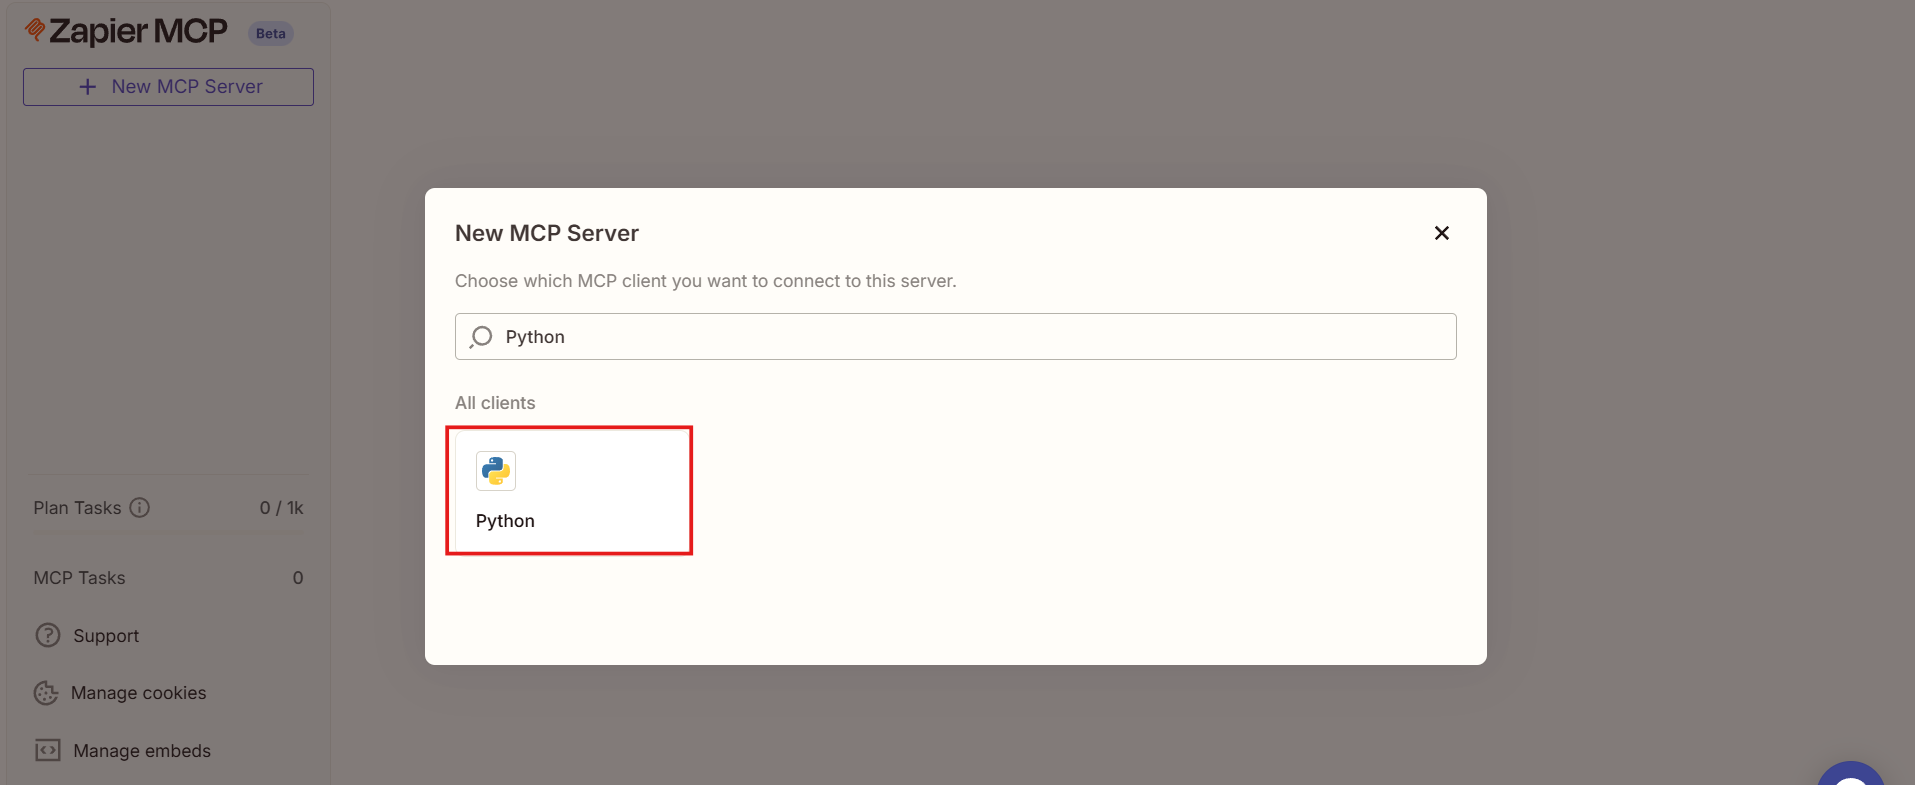
Once these options are selected, Zapier creates the MCP server and redirects you to its configuration page, where you can generate credentials, add tools, and manage how MCP clients connect and authenticate.
3. Generate Credentials and Connection Details
On the server configuration page:
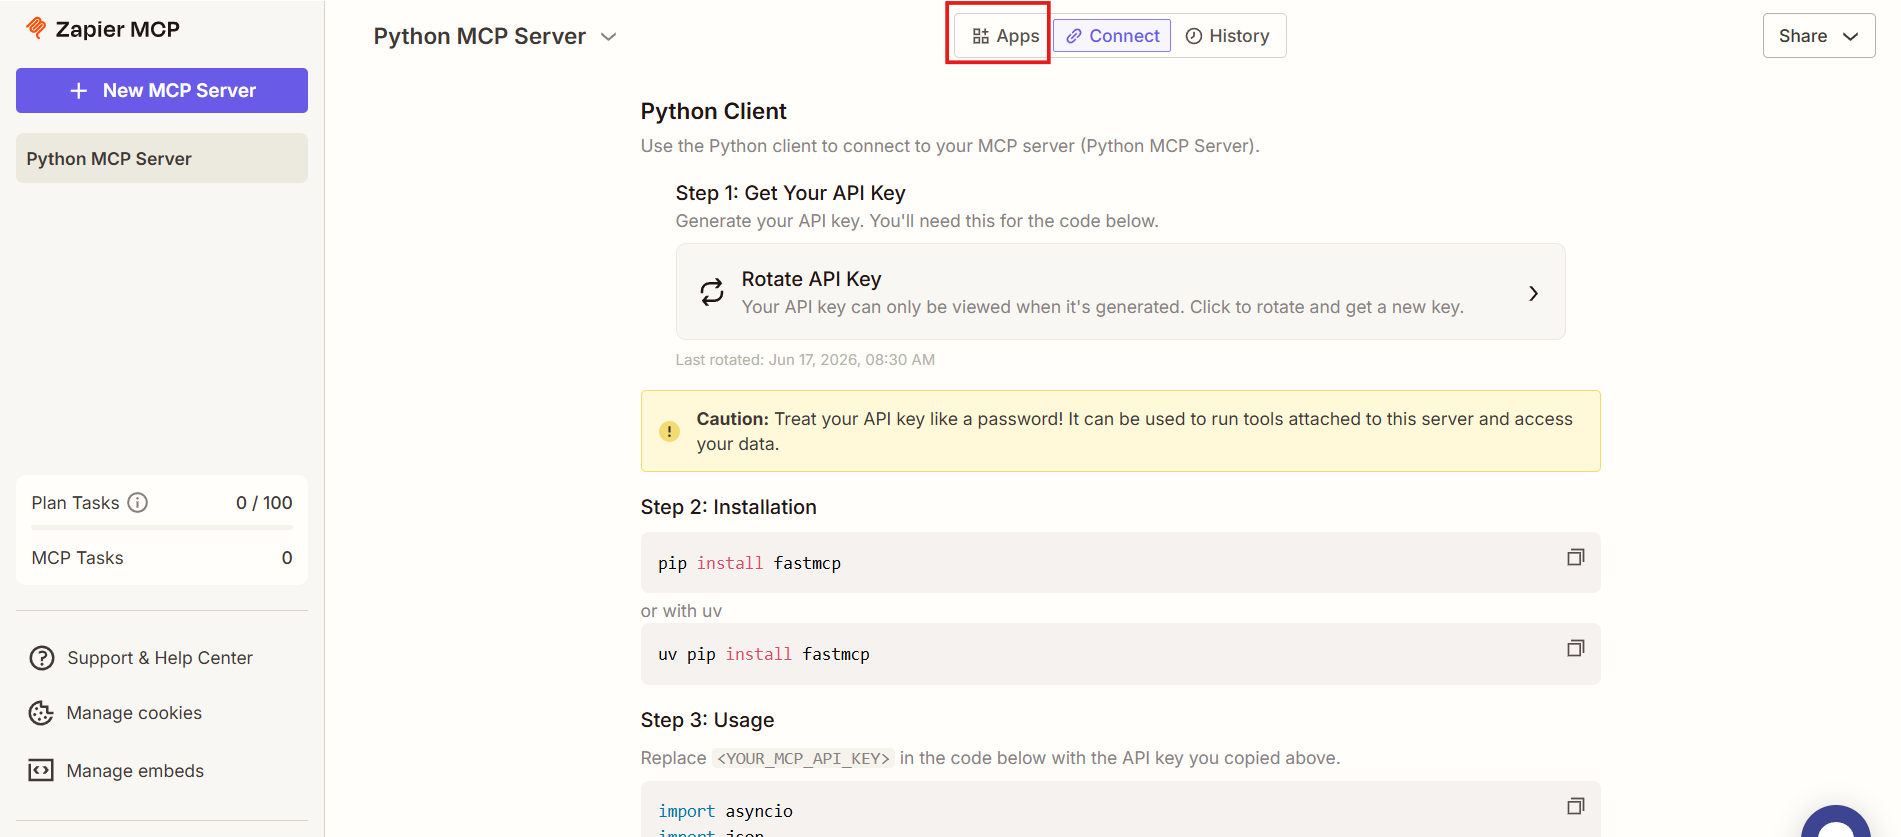
Open the Connect tab to access connection details and authentication settings for this MCP server
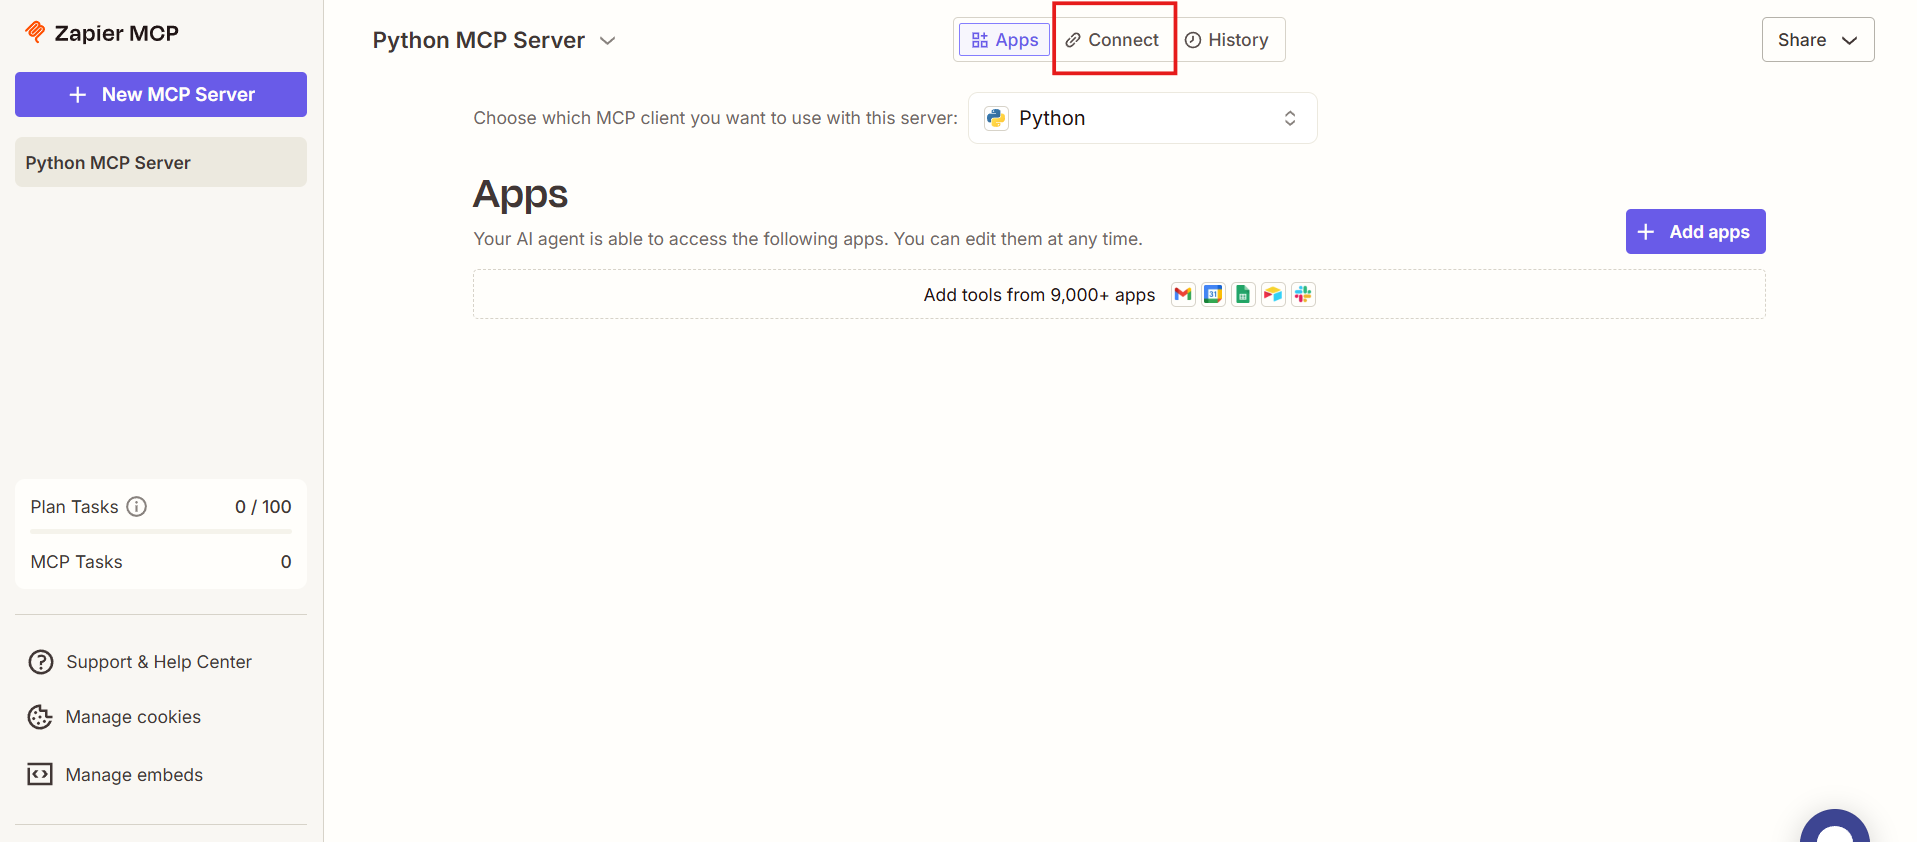
Click Generate an API key to create a credential that allows MCP clients to authenticate and make authorized requests to the server
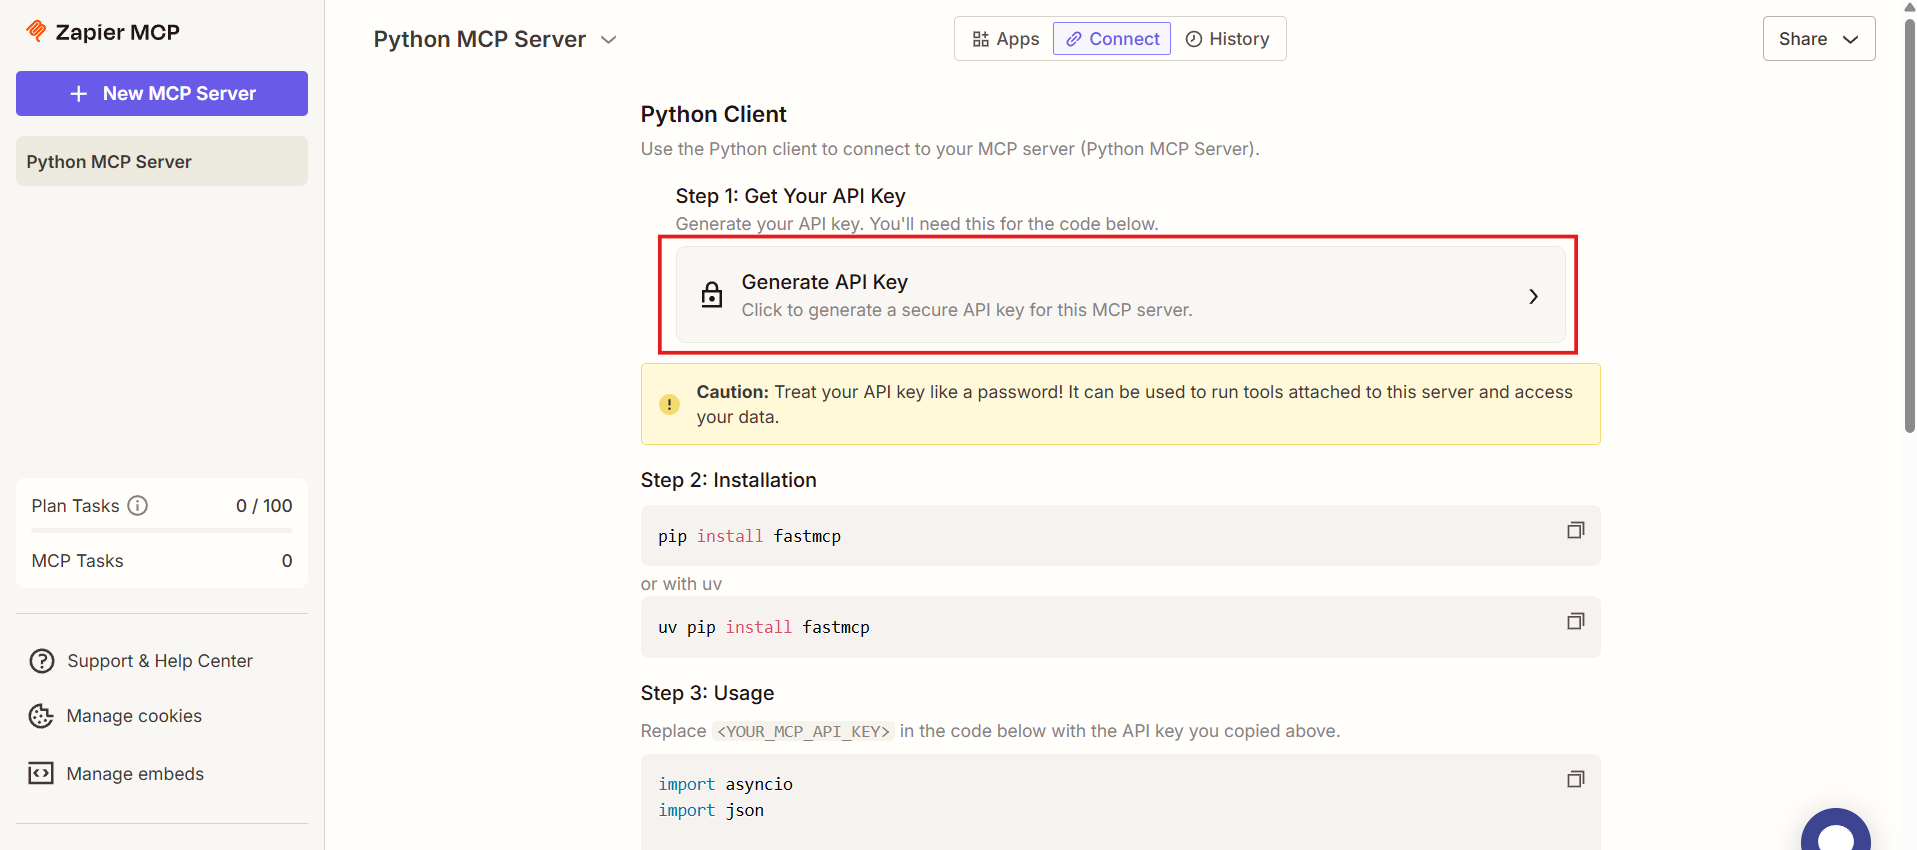
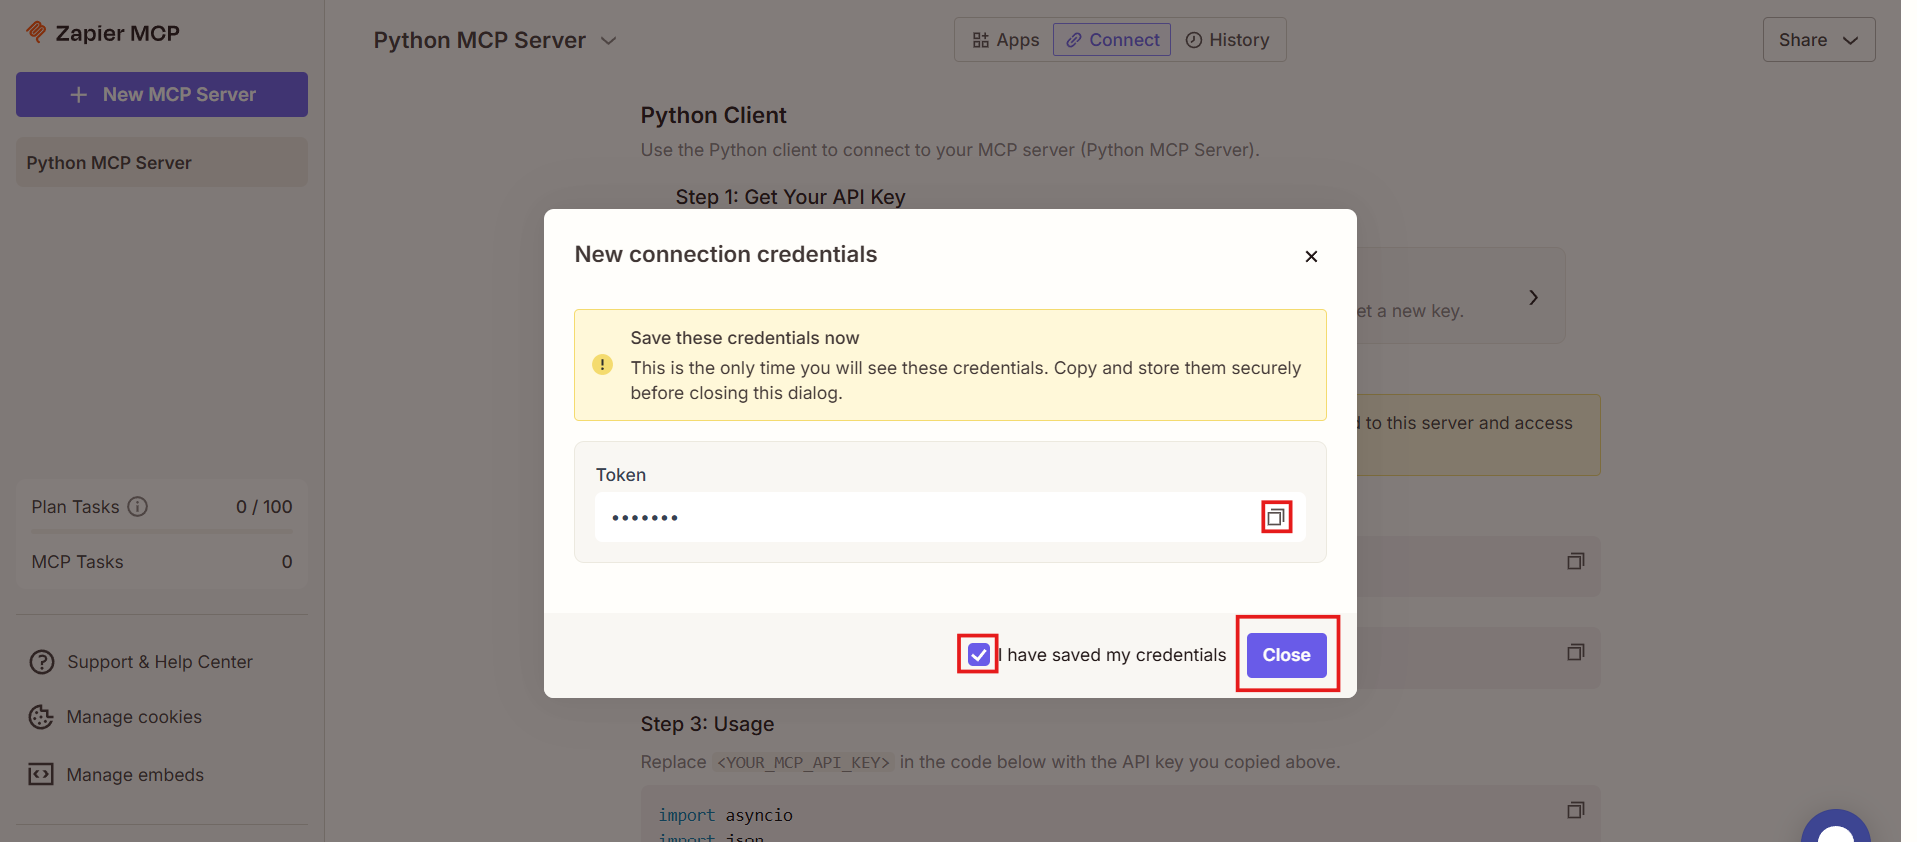
Once you do that, you will be prompted to Generate a connection token. This token contains the secret that will authenticate requests to your server.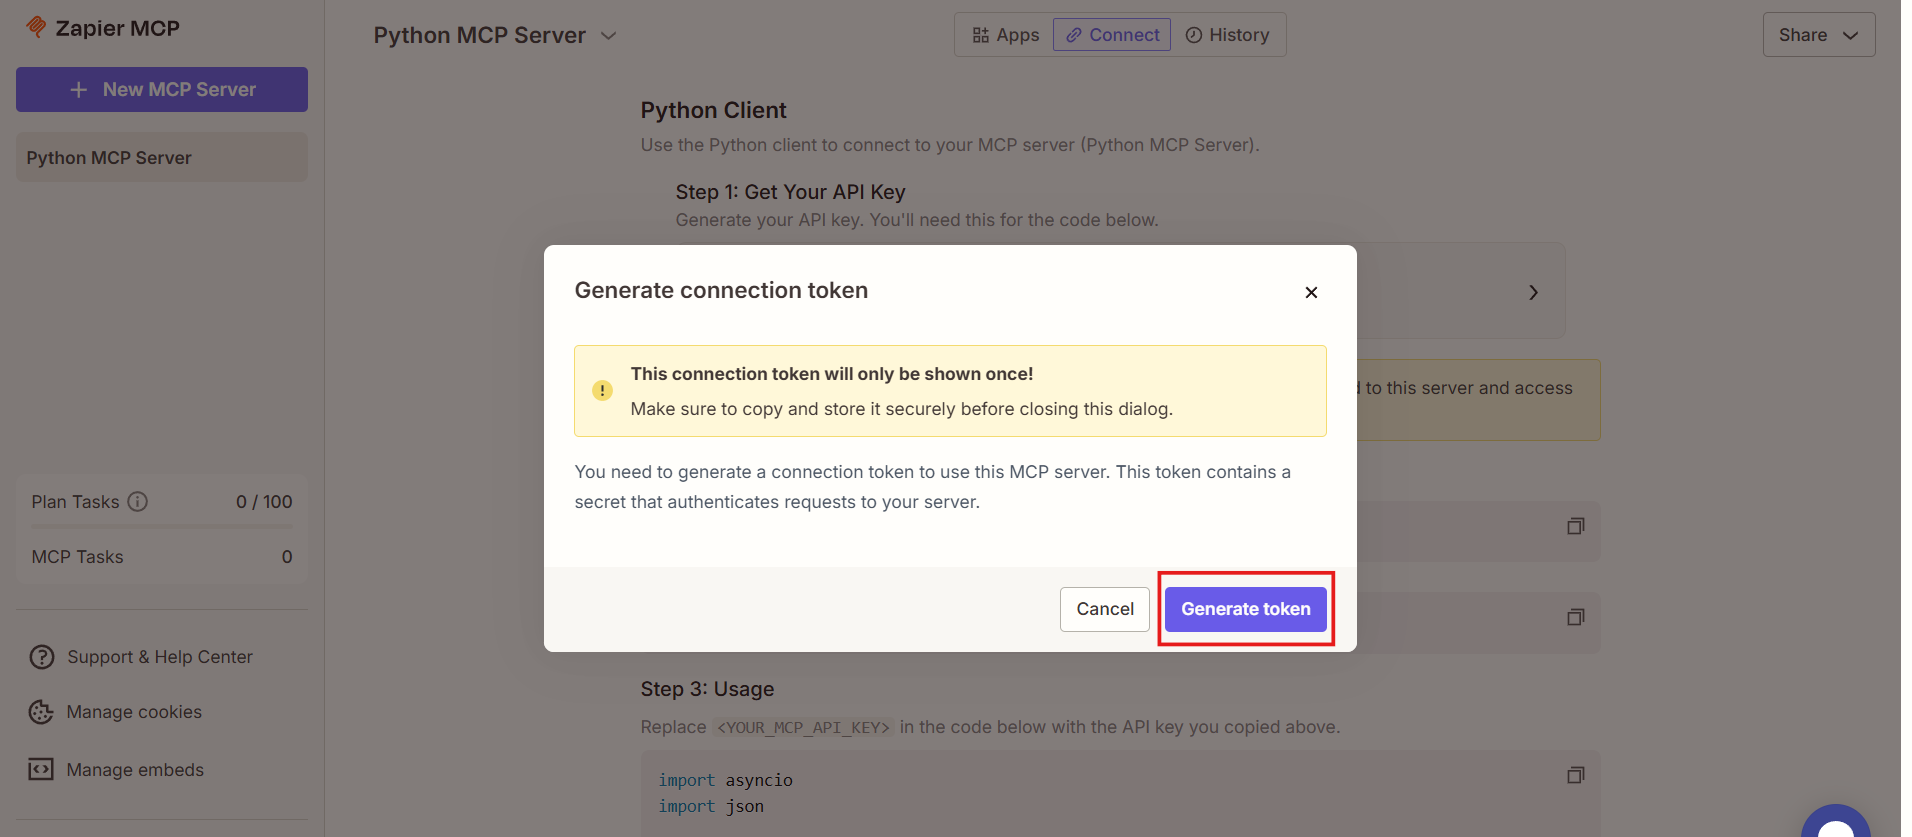
Once the token is generated, copy and save it somewhere safe before closing the dialog box.
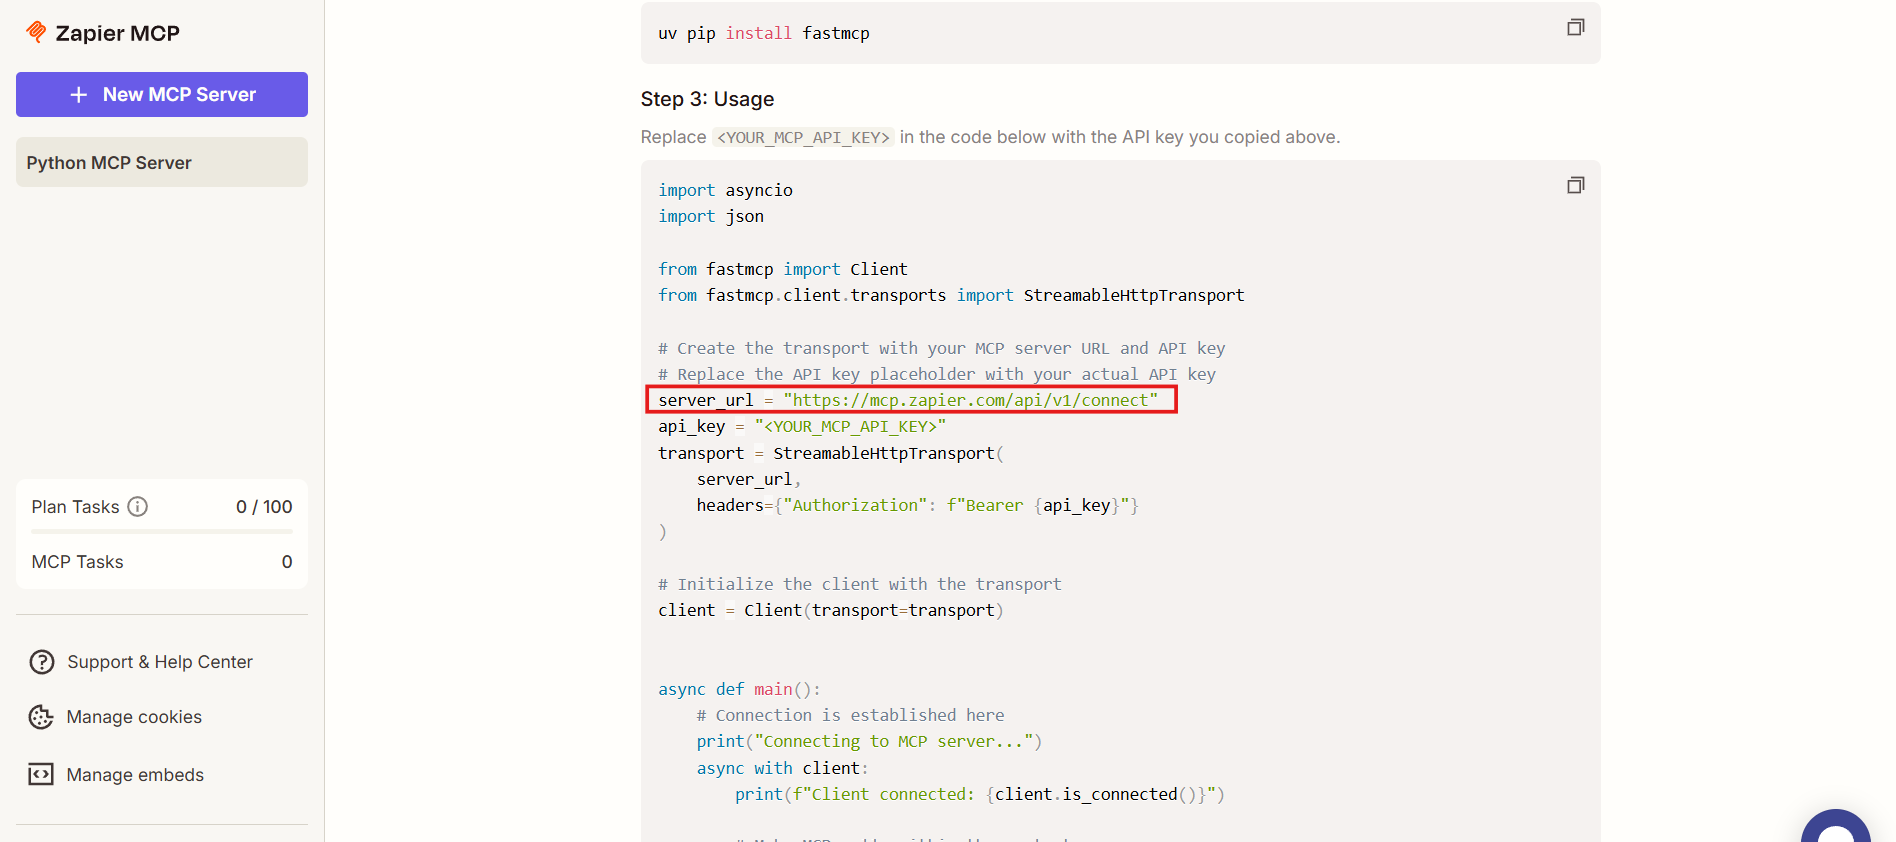
Scroll down and copy the server URL shown in the example code (This is important). Make sure you copy the server URL exactly as shown. This URL is what MCP clients will use to connect to Zapier.
4. Store Your Credentials Securely
At this point, you should have the MCP server URL and the Zapier MCP API key. Treat these credentials like any other sensitive secret. Do not commit them to source control or expose them publicly.
Step 2: Add Tools to Your MCP Server
Once the server is created, the next step is to define what actions it can perform.
1. Start Adding Tools
Go back to the Configure tab in your MCP server dashboard, where tools and server capabilities are managed
Click + Add tool to begin defining which actions and integrations this MCP server will expose to connected clients
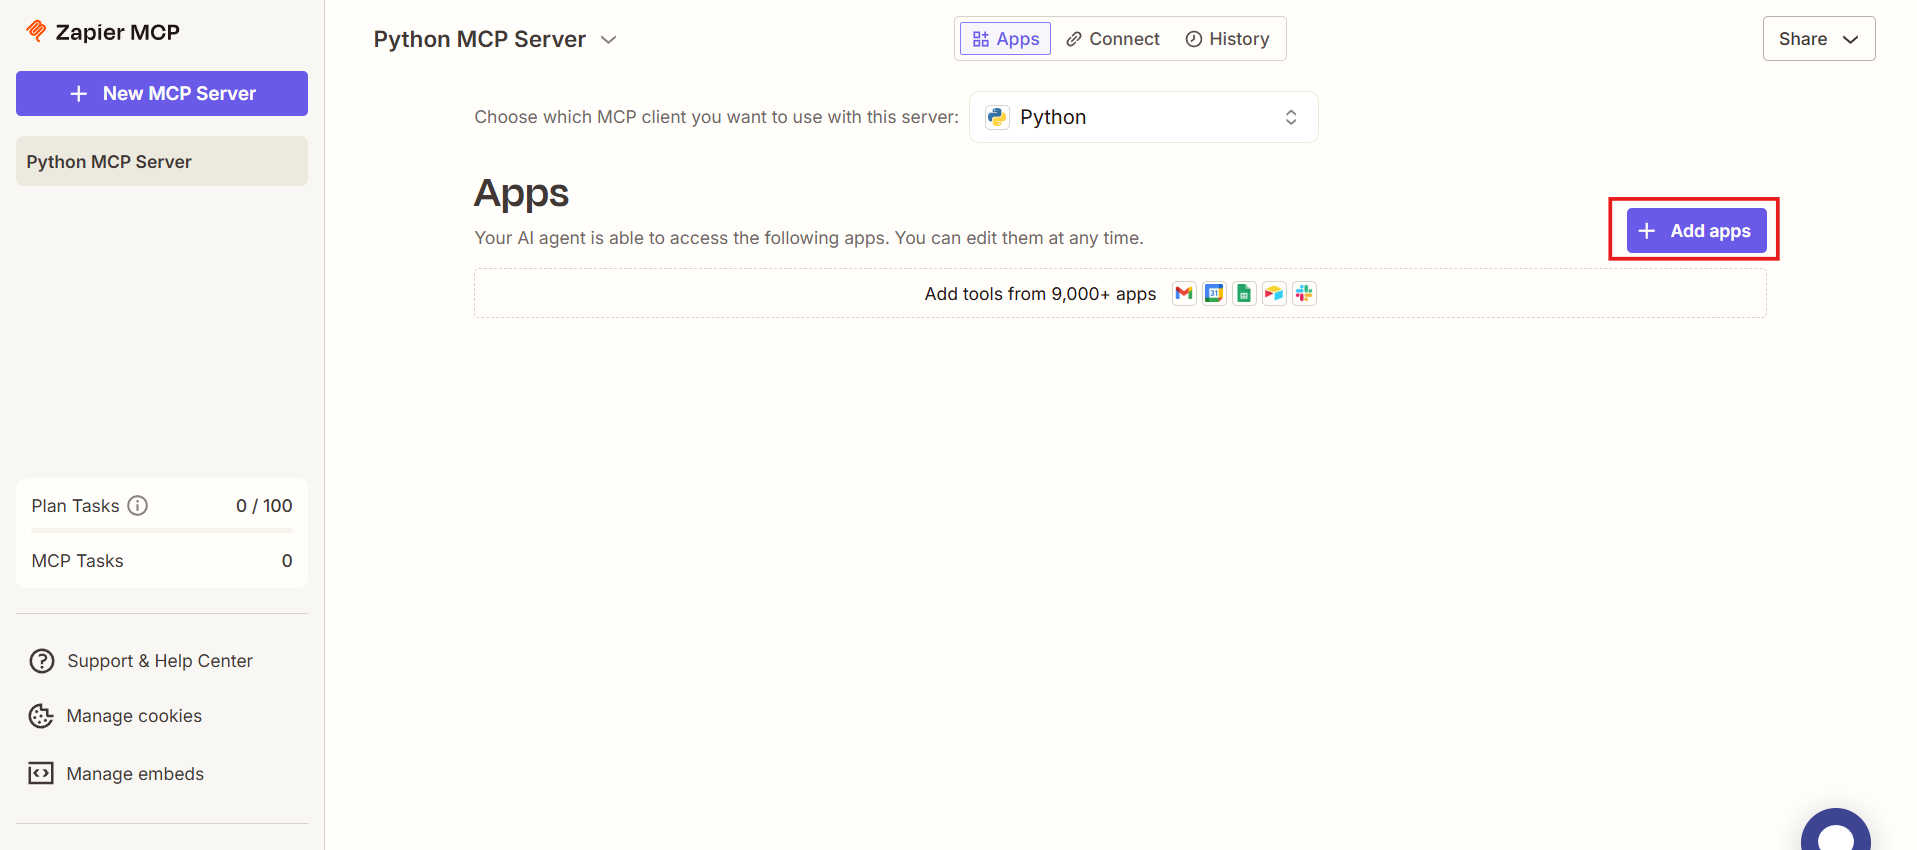
This opens a dialog where you define what capabilities the MCP server exposes.
2. Choose an Application
Use the search bar to find any supported Zapier app. Few examples are:
- Gmail: Email automation
- Google Calendar: Schedule management
- Google Sheets: Spreadsheet operations
- Google Docs: Document creation
- Google Forms: Form management
- Notion: Notes and databases
- Google Drive: File management
- Airtable: Database operations
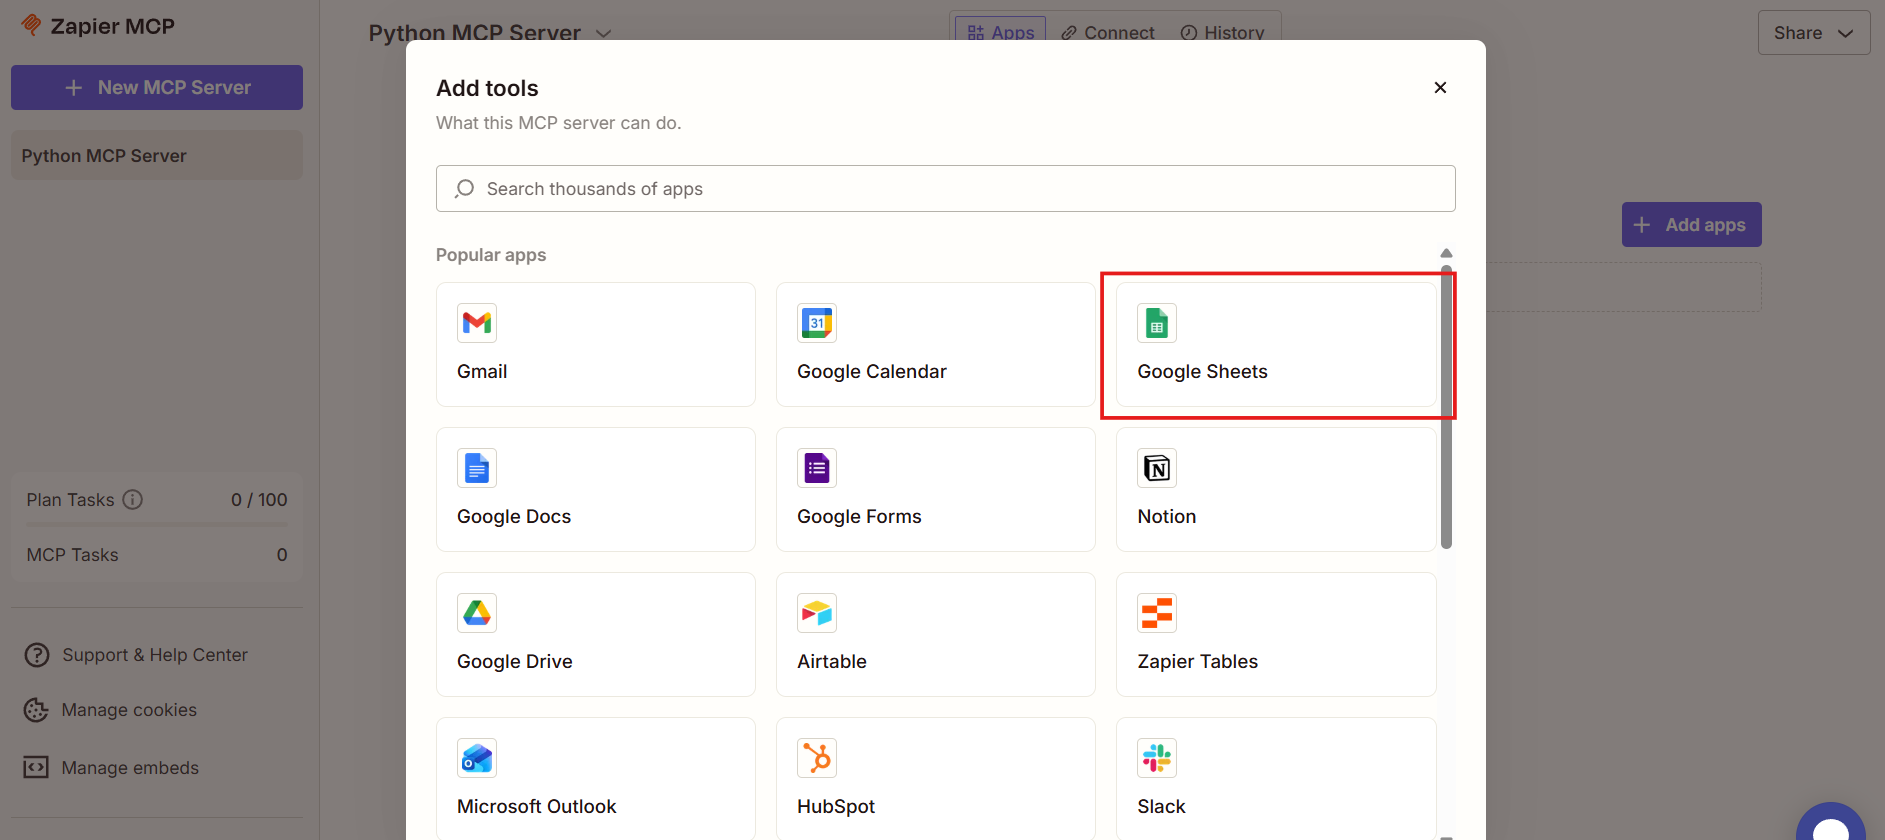
Each app represents a category of actions your AI system can perform. In this example, we are using Google Sheets.
3. Select Actions for the App
After selecting an app (for example, Google Sheets here), you will see available action categories:
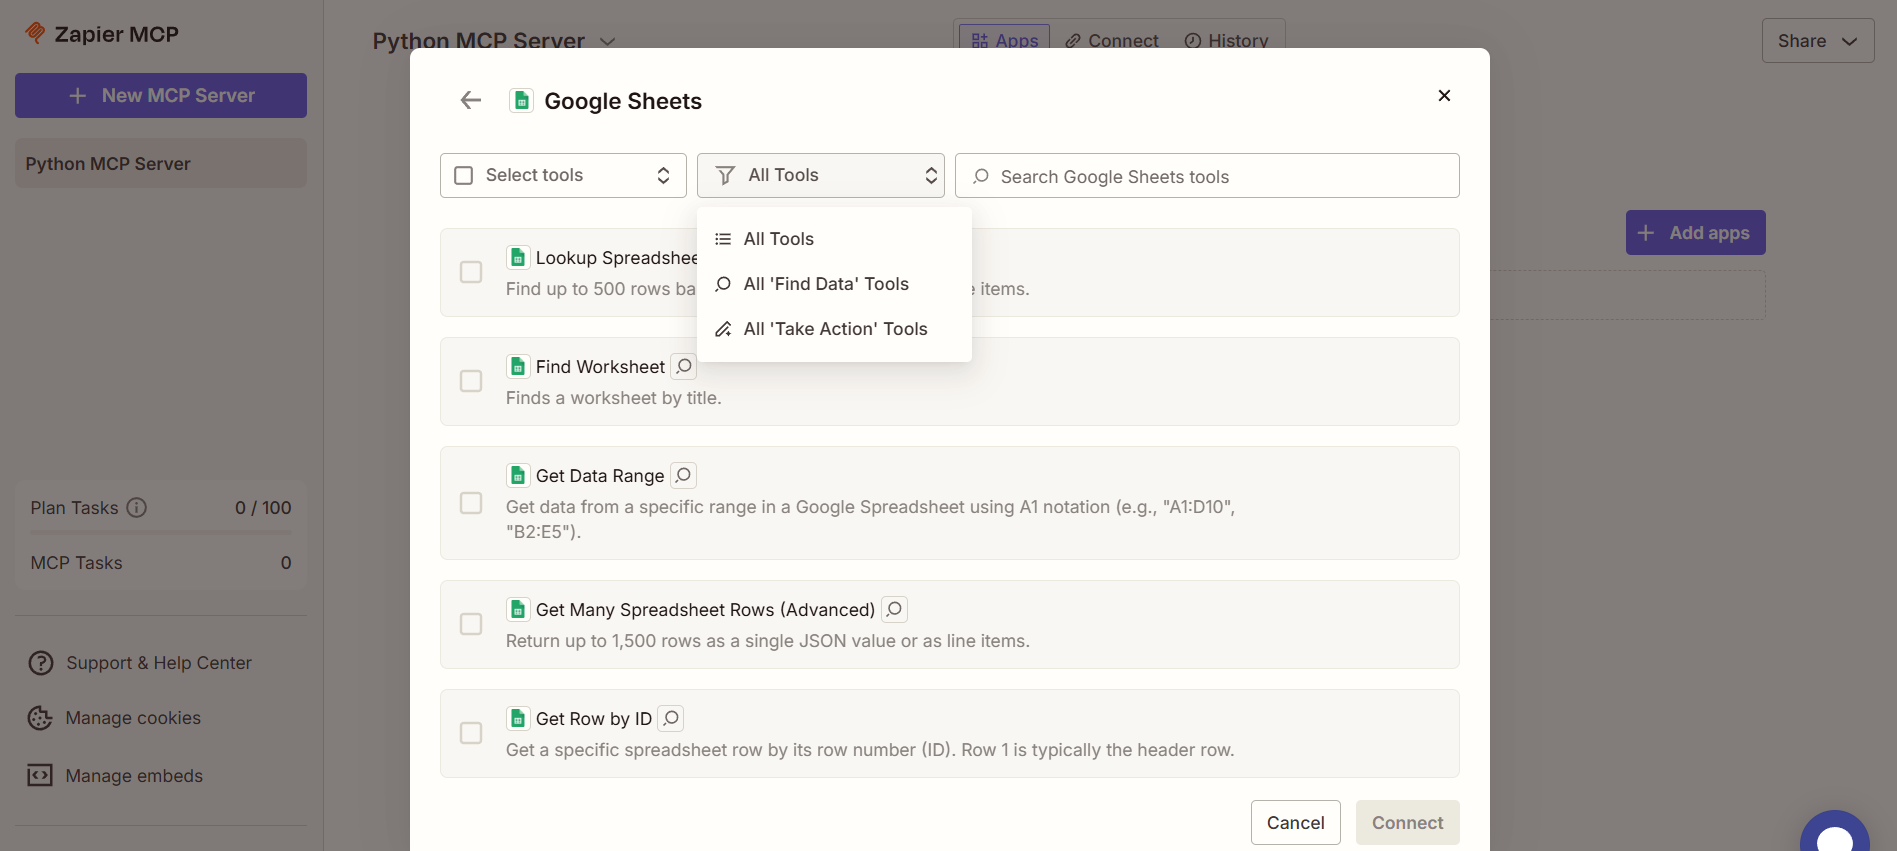
- Find data: For example, in Google Sheets App 'Lookup Spreadsheet Rows' is a find data tool
- Take action: 'Create Spreadsheet Column' is an example of a take action tool in Google Sheets
- Or you can choose to scroll though 'All' the options
For quick setup, you can choose 'All', which exposes every supported action for that app. This is often the easiest option when experimenting or building general-purpose systems. Alternatively, you can select individual actions if you want tighter control. Once you have selected your required tools, you can click the 'Connect' button.

4. Connect Your Account
If the selected app requires authentication, Zapier will prompt you to connect an account before proceeding. You can either choose from an existing connected account or initiate a new connection through the OAuth flow, which securely authorizes Zapier to access the necessary permissions on your behalf.
Once connected, Zapier can perform actions on behalf of that account.
5. Add the Tools
After selecting actions and connecting accounts:
Confirm your selection
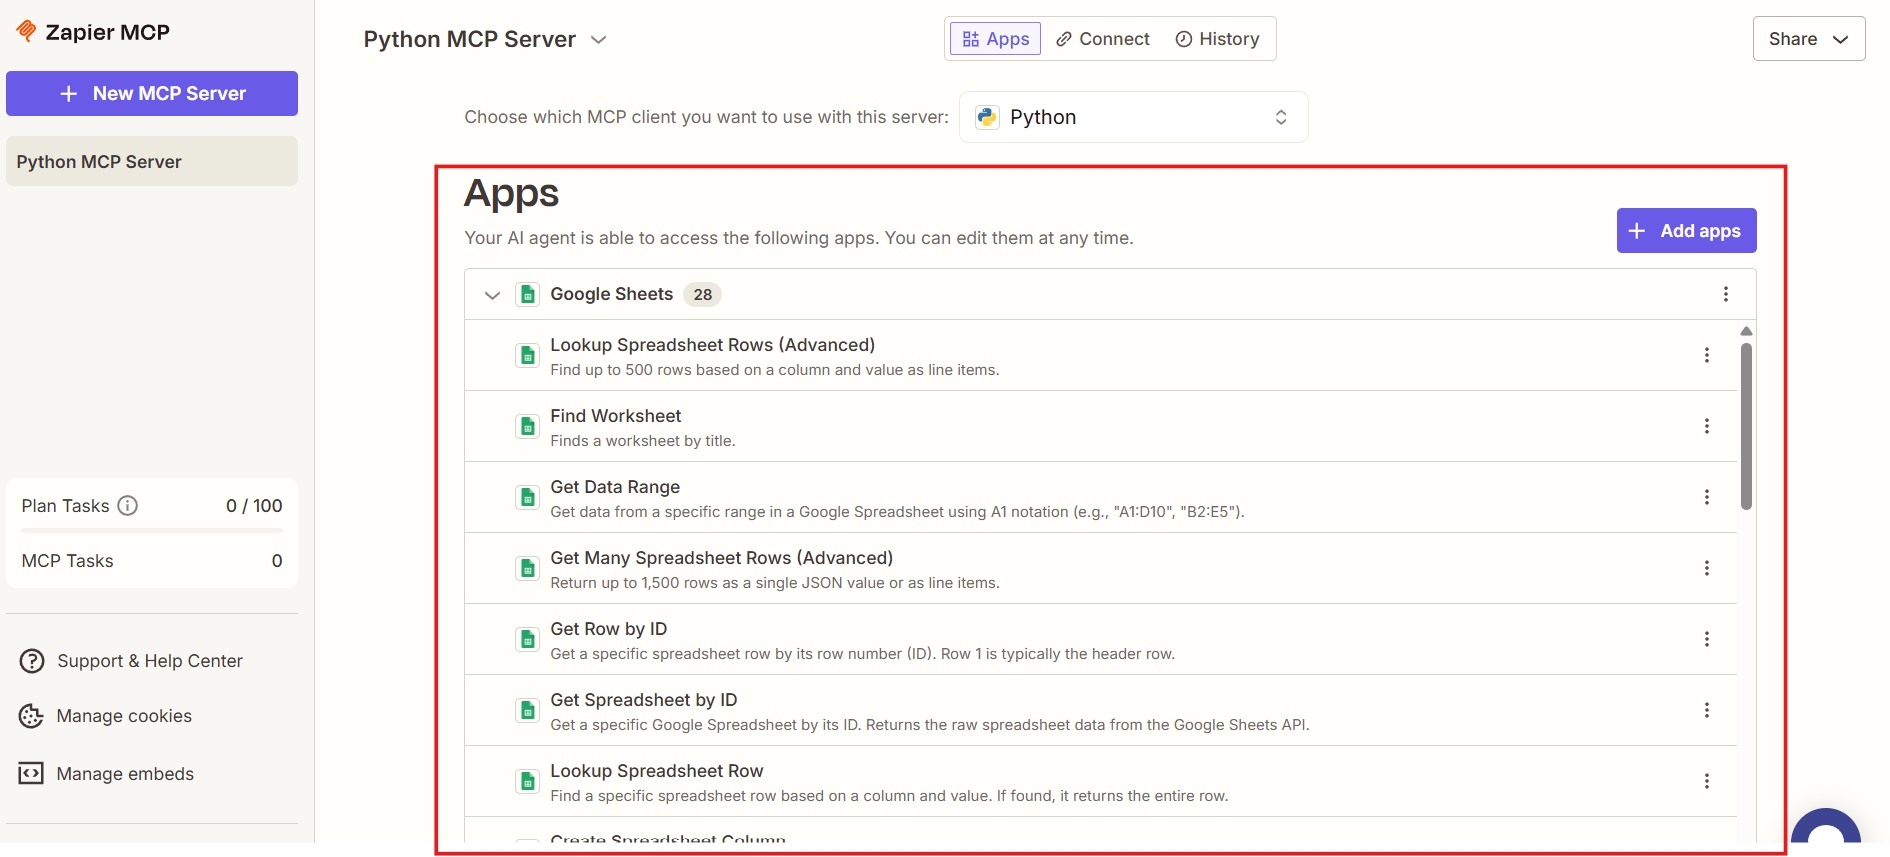
Zapier automatically adds the tools to your MCP server. These tools are now available to any MCP client that connects to the server.
Recommended Starter Tools
For general-purpose MCP setups, the following categories are commonly useful:
Communication
- Gmail: Send Email, Find Email
- Slack: Send Channel Message
Productivity
- Google Sheets: Create Row, Lookup Rows
- Google Calendar: Create Event, Find Event
- Notion: Create Page, Update Page
Task Management
- Todoist: Create Task, Find Task
- Asana: Create Task, Update Task
You can always add or remove tools later as your use cases evolve.
What Comes Next
At this point, your Zapier MCP server is fully configured and ready for integration. You now have a running MCP server backed by Zapier, an authenticated server URL with its corresponding API key, and a set of real-world tools exposed through MCP that can be programmatically discovered and invoked by compatible clients.
The next steps move from setup to usage: connecting an MCP client, testing basic tool calls, and designing workflows where an AI system can reason about when and how to invoke these actions. With this foundation in place, Zapier becomes a powerful execution layer for AI-driven systems—allowing agents to move from reasoning to action without tight coupling to individual application APIs.